
Signing the AWS CLI in without access keys, then proving a policy in the simulator
Published
From the course: Hands-on Cloud for Freshers, session 2: Who can do what: identities and permissions
You have just installed the AWS CLI, and the setup guide asks you to paste in an access key ID and secret. That leaves a long-lived secret sitting in a file on your laptop. Next you need a permissions policy, and you have no way to know whether it does what you meant until something breaks.
This lab shows that neither step needs that risk. The aws login command exchanges an ordinary console sign-in for temporary credentials that the CLI manages for you. The IAM policy simulator then tells you whether a policy would allow or deny an action, without sending a real request to any service. Together they let you work from the terminal with no stored keys, and check a policy before it can do any harm. The simulator is a rehearsal, not a guarantee, and this lab is explicit about where it stops.
The goal, and the three tasks that reach it
The lab has three tasks, in this order:
- Sign the CLI in without an access key, and confirm who it is acting as.
- Write a policy and prove its behaviour in the simulator.
- Find where the session is stored, look at it, and delete it.
The order matters. Every simulator command in task 2 is itself an AWS CLI call, so it needs the credentials from task 1. Task 3 tidies away what task 1 created.

Sign in first, simulate with that session, then delete it
Version 2.32.0 is the floor for signing in without keys
The aws login command needs AWS CLI version 2.32.0 or later. This lab is written against version 2.38.1, the current release, which is well past that floor. Confirm what you have installed with the global --version option:
$ aws --versionYou also need an identity that can sign in to the AWS Management Console. That can be the root user, an IAM user, or a federated identity from your identity provider. If your organisation uses IAM Identity Center, a separate configuration path applies instead.
The identity also needs permission to use this sign-in method. Attach the SignInLocalDevelopmentAccess managed policy to the IAM user, role or group. Root users need no extra permissions.
On a shared account, signing in as root to complete a lab is a poor habit. A sensible default is an IAM user or a federated identity that carries the managed policy above.
aws login turns a console sign-in into temporary credentials
Run the command in your terminal:
$ aws loginTo sign in to a named profile, or to create one, add --profile:
$ aws login --profile my-dev-profileIf the profile is new, or no Region is set, the CLI asks for an AWS Region and offers us-east-1 as the default. You can change the Region later with aws configure set region NEW_REGION.
The CLI then tries to open your default browser on the sign-in page. You can pick one of your active console sessions or sign in afresh. In the browser, choose the credentials to use, then return to the terminal.
Suppose the profile already holds a different session. For example, it was set up as a read-only user and you have now signed in as an admin user. The CLI asks whether to overwrite the existing session, and it waits for a y or n. A final message confirms the completed profile configuration.
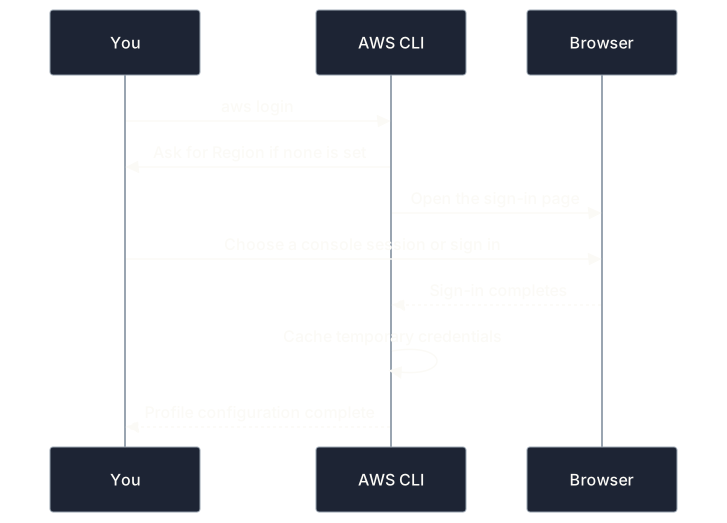
The browser proves who you are; the CLI keeps temporary credentials
The command still works on a machine with no browser, such as a remote server. Use aws login --remote and the CLI prints a URL to open on another device. After you sign in there, you copy the authorization code back into the CLI prompt.
You can also control which of the two flows is allowed. The two flows have separate resource ARNs that you can use in IAM policies:
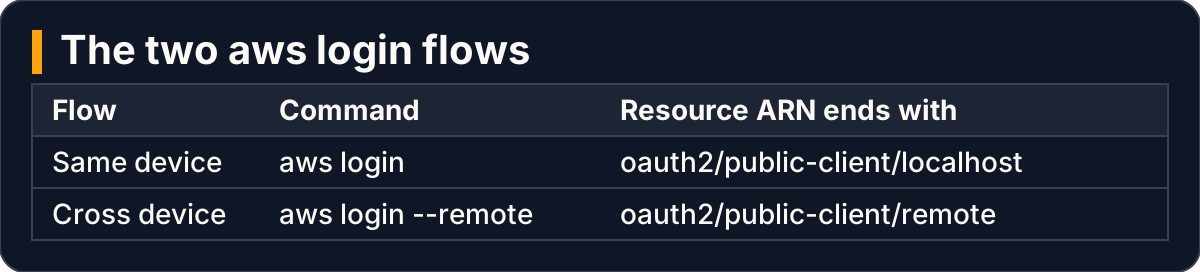
Same-device and cross-device sign-in each have their own ARN to allow or deny
get-caller-identity proves who the CLI now is
Before you trust the session, ask AWS who you are:
$ aws sts get-caller-identity
$ aws sts get-caller-identity --profile my-dev-profile
The first command uses the default profile. The second uses a named one. You should see the identity you chose in the browser.
The credentials then look after themselves. The CLI and SDKs refresh the cached credentials every 15 minutes as needed. The whole session lasts up to the IAM principal’s set session duration, to a maximum of 12 hours, after which you run aws login again.
Think of it as a day pass that renews itself at the turnstile, rather than a key you cut and carry forever.
The simulator answers “allowed or denied” without touching anything
The IAM policy simulator evaluates a request against the policies you give it. It never sends that request to any AWS service. For every action and resource you test, it returns one of two outcomes: allowed or denied. When the outcome is an allow or an explicit deny, it also names the policy statement that produced it.
The simulator has two modes:
- Principal mode tests the policies already attached to an existing user, role or group.
- Custom mode tests policies that you write or paste in. Nothing is saved to your account.
Custom mode is the one to use when checking a draft before you attach it. On the command line, custom mode is aws iam simulate-custom-policy. Policies already attached to an identity use simulate-principal-policy instead.

The simulator weighs policies and inputs, then returns a decision and no service response
A custom policy is proved with one command and a context value
Here is the draft policy. It allows every DynamoDB action, but only after a set date and time. The command below simulates the dynamodb:CreateBackup action and supplies a value for the aws:CurrentTime key that the condition checks:
aws iam simulate-custom-policy \
  --policy-input-list '{"Version":"2012-10-17","Statement":{"Effect":"Allow","Action":"dynamodb:*","Resource":"*","Condition":{"DateGreaterThan":{"aws:CurrentTime":"2018-08-16T12:00:00Z"}}}}' \
  --action-names dynamodb:CreateBackup \
  --context-entries "ContextKeyName='aws:CurrentTime',ContextKeyValues='2019-04-25T11:00:00Z',ContextKeyType=date"
The supplied date is later than the condition’s date. The result therefore shows "EvalDecision": "allowed", and its MatchedStatements entry points to PolicyInputList.1, the first policy you passed in.
A passing test proves little on its own. Now prove that the condition actually bites by changing the context value to 2014-04-25T11:00:00Z, a date before the one the policy requires. The decision becomes implicitDeny, and MatchedStatements is empty.
Two allowed actions on their own would not show that the condition works. A passing case alongside a failing one does. In practice, a sensible habit is to write one test that should pass and one that should fail for every condition you care about.
A few rules for the inputs:
- Action names must include the service prefix, such as
iam:CreateUser, and wildcards are not allowed. - If you leave out
--resource-arns, the resource defaults to*, meaning all resources. - The resources you name do not need to exist in your account.
Reading the result: the decision, the statement, the missing keys
Each result carries an EvalDecision with one of three values. When several statements apply, one explicit deny overrides any number of allows, and only the deny statement appears in the result.
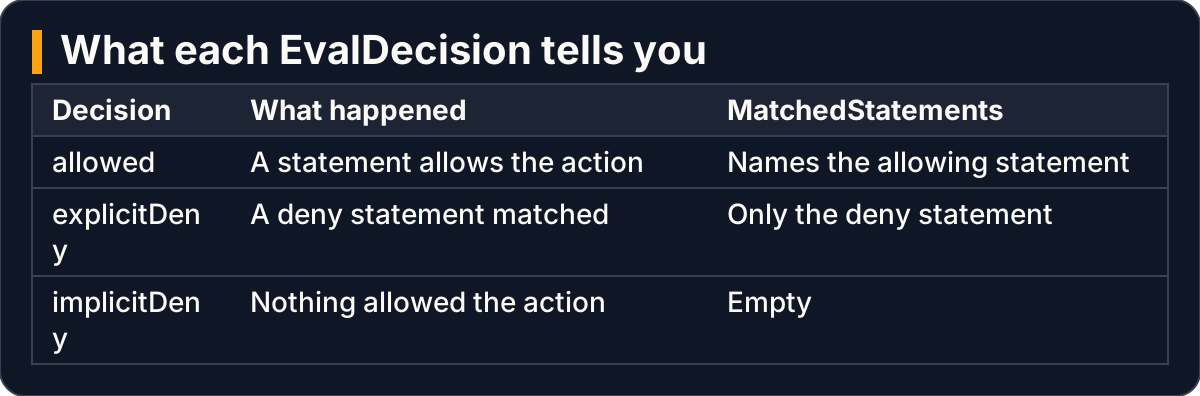
Two ways to be denied, and only one of them names a statement
Also watch MissingContextValues. It lists the context keys your policies need but that you did not supply. If a supplied value does not satisfy a condition, the action is denied.
The simulator fills in some keys by itself. These are the principal keys, such as aws:PrincipalAccount and aws:UserName, and organisation keys such as aws:PrincipalOrgID. You supply every other key yourself. To find out which keys a draft policy needs before you run it, the CLI reference points to GetContextKeysForCustomPolicy.
Several resources now come back as one aggregate answer
In version 2.38.1, the simulator returns a single evaluation result per action, however many resource ARNs you pass. Older behaviour returned one result per resource, each carrying the same overall decision.
The top-level EvalDecision is now the most restrictive decision across all resources. If any resource produces explicitDeny, the top-level decision is explicitDeny. To see the decision for each resource, read ResourceSpecificResults.
This affects how you read the output. The top-level EvalResourceName is now an ARN template for the resource type, not one of your ARNs. Any script that parsed per-resource answers from the top level needs to read ResourceSpecificResults instead.
Some features have limits worth knowing:
- You can include only one resource-based policy per simulation.
- The simulator never fetches a resource’s policy for you, so you must pass it in.
- Simulating resource-based policies is not supported for IAM roles.
- Service control policies can be passed in order, from the organisation root down to the account. Their matched statements are not shown in the results, for security reasons.
Cleaning up: where the session lives, how to look at it, how to delete it
Where it is stored. Signing in with the default profile writes a login_session line to the config file. That line holds your identity’s ARN, next to the Region. The temporary credentials, and the details needed to refresh them, are cached in ~/.aws/login/cache on Linux and macOS, or %USERPROFILE%\.aws\login\cache on Windows. The AWS_LOGIN_CACHE_DIRECTORY environment variable moves that cache to another location.
Look at it. Open the config file and find the login_session entry for your profile. List the cache directory too; its file names are based on the resolved profile.
Delete it. You can let the credentials expire, or remove them now:
$ aws logout
$ aws logout --profile my-dev-profile
$ aws logout --all
With no profile on the command line or in AWS_PROFILE, aws logout signs out the default profile. The --all option signs out every profile that uses login credentials.
The policy work needs no cleanup. Custom-mode policies are never saved to your account, and editing a policy inside the simulator leaves the real one unchanged.

A login session is written to two places and removed by one command
Key takeaways
aws loginneeds CLI version 2.32.0 or later. It swaps a console sign-in for temporary credentials that refresh themselves for up to 12 hours, so no long-lived key is stored on disk.- Confirm the session with
aws sts get-caller-identitybefore you rely on it. - Prove a draft policy in custom mode with
simulate-custom-policy. Pair a case that should pass with one that should fail, and supply every context key the conditions check. - In version 2.38.1, read per-resource decisions from
ResourceSpecificResults; the top-level decision is an aggregate of all resources. - Clean up with
aws logout. Simulated policies leave nothing behind in your account.
The limit is the one the simulator states about itself: its results can differ from your live environment. It does not evaluate resource control policies. It can also diverge on VPC endpoint policies, role chaining, or resources that have several resource-based policies. A simulated “allowed” is strong evidence, not proof. This lab does not cover the final check: confirming the attached policy’s behaviour against your live account.