
How to find the closed port that stops an EC2 web page loading, and lock down SSH
Published
From the course: Hands-on Cloud for Freshers, session 4: Your first server: EC2
You launched an Amazon EC2 instance, installed a web server, and typed its public address into a browser. The tab spins and then times out. Nothing on the server looks broken, and the cause is outside the server. In almost every first attempt, the block is the instance’s security group, the virtual firewall that sits in front of it. This article argues that two changes fix the problem and make the instance safer. First, open only ports 80 and 443 to the world. Second, close SSH to everyone except you, and use EC2 Instance Connect so you stop handing out keys. The steps below cover where to look, what each rule should say, what you should see afterwards, and what to remove when you finish.
The page times out because no inbound rule admits web traffic
A security group acts as a virtual firewall for your EC2 instances and controls incoming and outgoing traffic. Inbound rules control the traffic coming in to your instance, and outbound rules control the traffic going out. The only traffic that reaches the instance is the traffic the security group rules allow.
Think of it as a guest list at a door. Nobody gets in unless the list names them. A browser asking for your page is a guest the list does not yet name. The web server process may be running perfectly, but the request is turned away before it reaches the server.
This also explains why the failure usually shows up as a timeout rather than an error page. In practice, a request the firewall drops never gets a reply, so the browser waits until it gives up. If you see a slow timeout instead of an immediate refusal, a missing rule is the first thing to check.

A browser request reaches the web server only if a security group rule allows it
Step 1 — Read every security group on the instance, not just one
Goal: find out which rules actually apply to your instance.
You can associate an instance with several security groups, and you can associate one security group with several instances. When Amazon EC2 decides whether to let traffic reach an instance, it evaluates all the rules from all the security groups associated with that instance. If you did not specify a security group at launch, Amazon EC2 used the default security group for the VPC (your private network inside the cloud).
That gives you a short investigation:
- Open the instance’s details in the EC2 console and list every security group attached to it.
- For each group, open the Inbound rules.
- Look for a rule with protocol TCP, port 80 or 443, and a source that includes the address you are browsing from.
What you should see: if no group has such a rule, you have found the closed door. A common surprise is an instance running on the default group. In practice that group often has no rule for web traffic from the internet, because nobody added one.
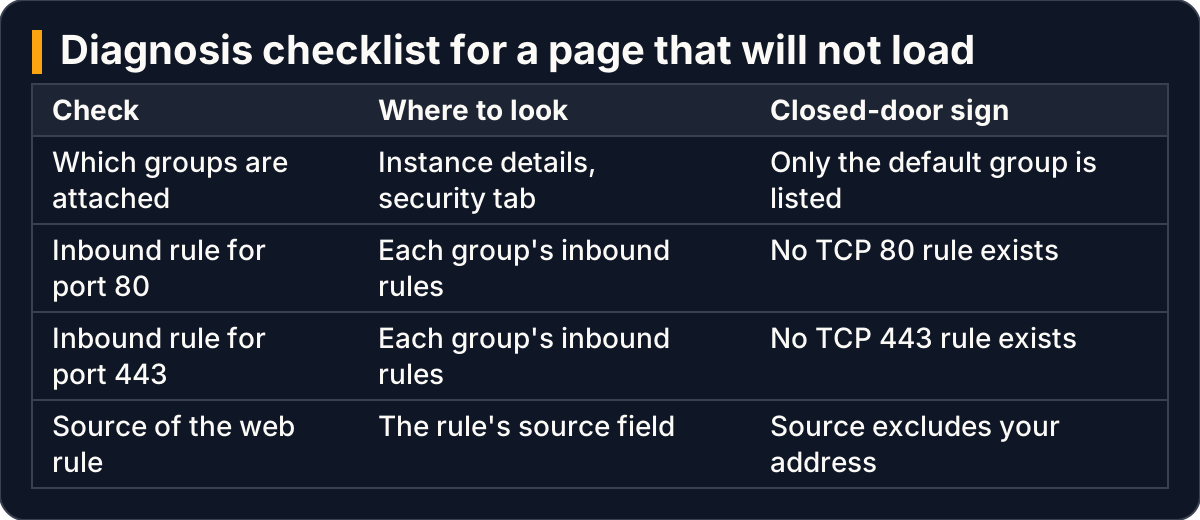
Every attached group counts, so check each group’s inbound rules for ports 80 and 443
Step 2 — Add the web server rules and watch the page load
Goal: let anyone on the internet reach your page, and nothing else.
An instance set up as a web server needs security group rules that allow inbound HTTP and HTTPS access. The documented rules allow TCP port 80 (HTTP) and TCP port 443 (HTTPS) from 0.0.0.0/0, which means any IPv4 address. If your VPC is enabled for IPv6, you can add matching rules for port 80 and port 443 from ::/0, meaning any IPv6 address. TCP has protocol number 6. You may see that number in rule listings.
Add these rules to one of the groups attached to the instance. Do not add them to an unrelated group.
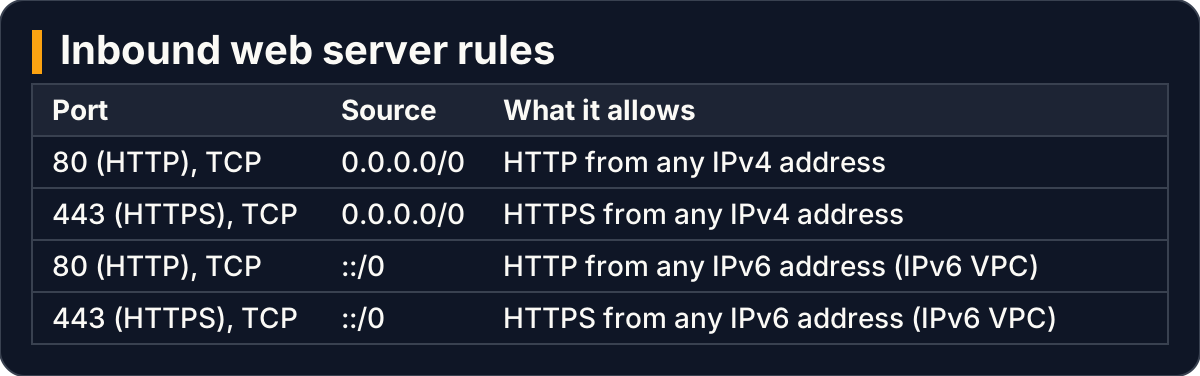
Four inbound rules open HTTP and HTTPS to any IPv4 or IPv6 address
You do not need to restart anything. You can change a security group’s rules at any time, and new or modified rules are applied automatically to every instance associated with the group.
You also do not need a matching outbound rule for the replies. Security groups are stateful: responses to allowed inbound traffic may flow out regardless of the outbound rules. The reverse also holds. If your instance sends a request, the response may flow back in regardless of the inbound rules.
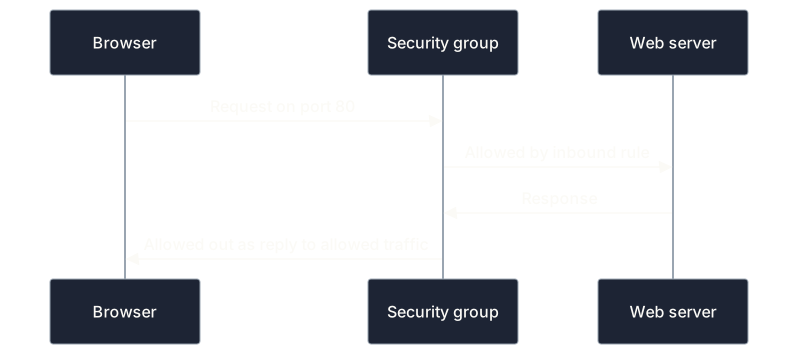
Statefulness lets the reply leave without an outbound rule once the request is allowed in
What you should see: reload the browser tab and the page should appear. If it still times out, a sensible next check is whether the web server is listening on the port you opened. A rule for 443 does nothing if the server only serves on 80.
Step 3 — Narrow SSH to your own address
Goal: keep your administrative access and close it to everyone else.
To connect to a Linux instance, the security group must have an inbound rule allowing SSH, which is TCP port 22. Windows instances use RDP on port 3389 instead. The documented source for that rule is not “anywhere”. It is the public IPv4 address of your computer, or a range of addresses in your local network. If your VPC is enabled for IPv6 and your instance has an IPv6 address, you can enter an IPv6 address or range instead. Ranges are written in CIDR notation: an address followed by a slash and a prefix length, such as /32 for exactly one IPv4 address.
The difference between the web rules and the SSH rule is the point of this step. Your page is meant for everyone. Your shell is meant for you. A sensible default is to treat any port 22 rule with source 0.0.0.0/0 as a mistake to correct, even when it was added “just to get in”.
- In the group’s inbound rules, find the SSH rule on port 22.
- Change its source from 0.0.0.0/0 to your computer’s public address with /32, or to your local network’s range.
- Save. The change applies automatically to every instance associated with the group.
What you should see: SSH from your own machine still works, and SSH from any other network no longer reaches the instance. Keep in mind that your public address can change when you move between networks. In practice, if you suddenly cannot connect from a new location, the source in this rule is the first thing to update.

Web ports face the whole internet while SSH faces only your own address
Step 4 — Stop sharing keys by connecting through EC2 Instance Connect
Goal: control who may SSH in through permissions rather than by passing private key files around.
Narrowing the source address limits where SSH can come from. It does not decide who holds the key. EC2 Instance Connect addresses that second question. It provides a secure way to connect to Linux instances over SSH. It uses identity and access management policies and principals to control SSH access, which removes the need to share and manage SSH keys. Every connection request made with EC2 Instance Connect is logged, so you can audit connection requests.
Here is how a connection works. The EC2 Instance Connect API pushes an SSH public key to the instance metadata, where the key remains for 60 seconds. An access policy attached to your user is what authorises you to push that key. On the instance, the SSH daemon uses two settings, AuthorizedKeysCommand and AuthorizedKeysCommandUser, which are configured when EC2 Instance Connect is installed, to look up the public key in the instance metadata and authenticate you.
Think of it as a visitor badge printed at reception: it is issued to a named person, it works only briefly, and the desk keeps a record. A long-lived key file is more like a house key that can be copied and lent without anyone knowing.
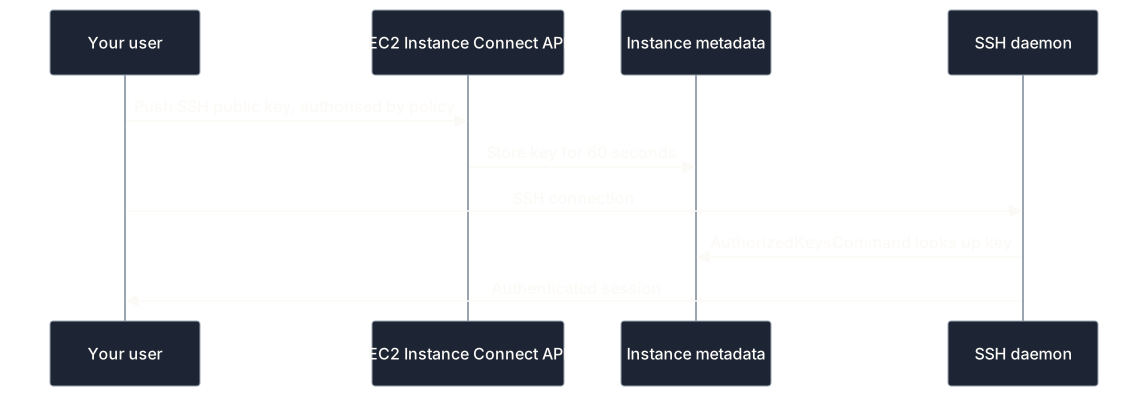
Instance Connect pushes a short-lived key that the SSH daemon looks up to authenticate you
You can connect with EC2 Instance Connect from the Amazon EC2 console or from the SSH client of your choice. It costs nothing extra. As of 2026-10-14, it is available in all AWS Regions except the European Sovereign Cloud (Germany), and it is not supported in Local Zones.
One point is easy to miss. Instance Connect still connects over SSH, so the port 22 rule from Step 3 still matters. Instance Connect decides who is allowed, and the security group decides from which address. In practice you want both controls in place.
What you should see: a shell session opens without you having copied a private key onto your machine. Each attempt is recorded in the audit log.
Step 5 — Clean up what you opened
Goal: leave nothing exposed that you no longer need.
Security is a shared responsibility. Security groups are one tool, and you have to configure them to meet your own needs. That responsibility includes removing things as well as adding them. Rules can be modified at any time, you can change an instance’s security groups after launch, and you can delete a security group.
A sensible teardown order:
- Remove any temporary rule you added while debugging, especially an SSH rule open to 0.0.0.0/0.
- If you are finished with the instance, remove it before deleting groups, so no group is still associated with something running.
- Delete any security group you created only for this exercise.
Security groups carry no additional charge. Cost is therefore no reason to delete them. The reason is exposure: a forgotten wide-open group can later be attached to a new instance by mistake.

Teardown removes risky rules first, then the instance, then the groups made for the exercise
When the security group is not the whole story
Security groups are not the only possible filter. If your requirements go beyond what security groups provide, you can run your own firewall on the instance as well. If you or a setup script has done that, a correct security group can still sit in front of a host firewall that blocks port 80. Also, if the instance sits behind a load balancer, the load balancer’s own security group must allow communication with the instances. In that design, the browser’s traffic meets the load balancer’s rules first.
Key takeaways
- A page that times out on a fresh instance is most often a missing inbound rule. Check every security group attached to the instance, because all of their rules are evaluated together.
- Web traffic needs inbound TCP 80 and 443 from 0.0.0.0/0, plus ::/0 when the VPC uses IPv6. Rule changes apply at once, and statefulness lets replies out without an outbound rule.
- SSH on port 22 should come from your own public address or local range, never from everywhere.
- EC2 Instance Connect replaces shared keys with policy-controlled, short-lived keys and logged connection requests, but it still needs the port 22 rule.
- Clean up deliberately: remove temporary open rules first, then delete groups made only for the exercise.
This article does not settle everything a stuck page can involve. It does not cover a web server that is not listening, a firewall on the instance itself, or what happens to the instance’s public address when you stop and start it, which the source pages used here do not describe. It also explains each change in terms of the rules to set, not the exact command-line syntax, which those pages do not give.