How to set up a new AWS account so a mistake cannot quietly cost you money
Published
From the course: Hands-on Cloud for Freshers, session 1: A safe first AWS account
You have just created an AWS account. The console is open, and there are hundreds of services one click away. One fear stops most people here: that a forgotten test server keeps running and the first sign of trouble is a bill. That fear is reasonable, and it can be answered. A new account becomes safe to experiment in when you do four things in a set order: lock the root user with a second factor, stop using the root user for daily work, set alarms that email you before money moves, and run one small build-and-delete cycle so you see those alarms work. Each step closes a different gap. Skip one, and a mistake can still go unnoticed.
The steps run as a lab. Each one states the goal, the clicks, what you should see, and how to undo it. The instructions use the AWS Management Console, the web interface, throughout.
Your account plan decides what a mistake can cost
Before you change anything, find out which plan the account is on. New accounts currently fall under the enhanced Free Tier, which offers up to $200 in credits and a six-month Free Plan. Under that tier there are two kinds of account. A free account plan has only “Always Free” offerings active. A paid account plan can also have “Short-term trial” offerings active.
The difference matters when you go past a limit. On a paid plan, Free Tier credits are applied automatically to eligible costs when you exceed a service’s free limit or use paid features. Once those credits expire or run out, you pay standard rates for usage beyond the free limits. Think of the credits as a cushion, not a wall. They absorb a mistake for a while, but they do not stop the meter.
You can check where you stand at any time. On a free account plan, you can see the plan’s expiration date, credit balance and days remaining in the console home or through a widget. You can also read them through the SDK and command line at no cost. AWS also sends periodic emails about your credit balance and about the plan nearing its end.
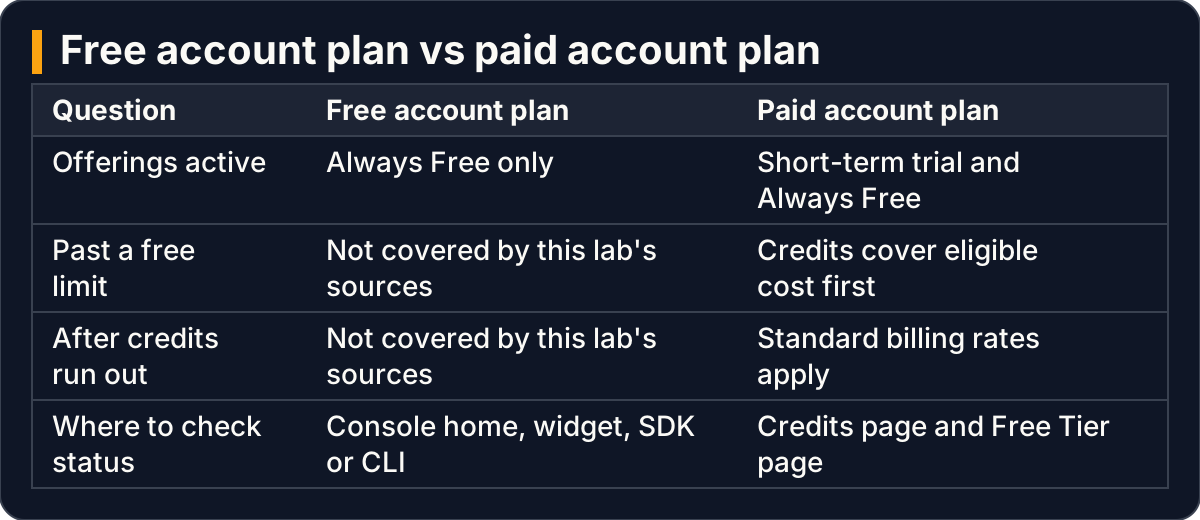
The two account plans differ in which offerings are active and what happens past a free limit
Task 1: A second factor locks the root user before anything else
Goal: make the root user (the email-and-password identity that created the account) unusable without a code from your phone.
The order matters here. You can only enable multi-factor authentication (MFA) on the account while signed in with the root user’s credentials. A “virtual MFA device” is an authenticator app that produces short-lived codes.
Steps:
- Sign in to the console as the root user.
- On the right side of the navigation bar, choose your account name, then Security credentials.
- In the Multi-Factor Authentication (MFA) section, choose Assign MFA device.
- Type a device name, choose Authenticator app, then Next.
- Open your authenticator app and add a new account. Choose Show QR code and scan it. If your device cannot scan, choose Show secret key and type it in.
- Type the code the app shows into MFA code 1. Wait up to 30 seconds for the next code, type it into MFA code 2, and choose Add MFA.
What you should see: the app produces six-digit numbers, and the device becomes ready for use with AWS.
There are two traps in this task. First, submit the two codes right after you generate them. These are time-based one-time passwords that expire quickly. If you wait too long, the device is still attached but falls out of sync, and you then have to resync it.
Second, plan for losing your phone. Make a secure backup of the QR code or secret key, or register more than one device. The root user and IAM users can have up to eight MFA devices. If you lose the only device and cannot recover it, you cannot sign in, and you must contact customer service to remove MFA from the account.
Cleanup: none. This change stays.
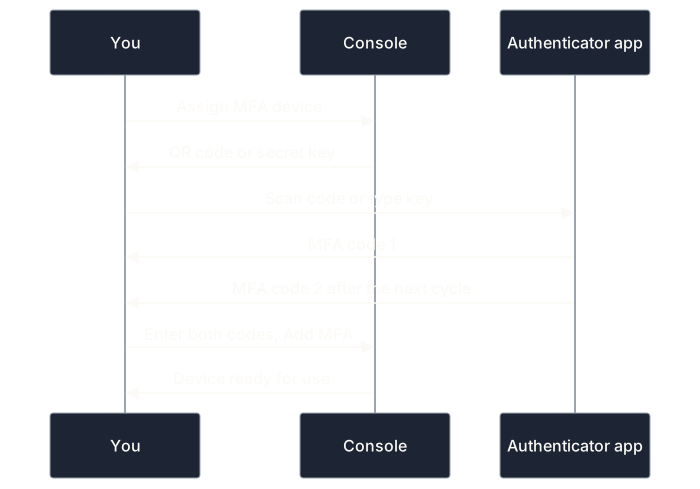
Enabling root MFA takes two consecutive codes, entered promptly, to bind the app to the account
Task 2: An everyday administrator lets the root user stay locked away
Goal: stop signing in as root for routine work.
The reasoning is a matter of judgment, not a documented rule. The root user owns everything, including billing and the MFA you just set. Every routine sign-in is one more chance to expose it. A sensible default is to create a separate identity with administrator permissions, protect it with its own MFA, and use only that identity from now on.
The sources behind this lab do not give the click path for creating that identity, so this article does not invent one. Two facts do carry over from Task 1. IAM users can register MFA devices just as the root user can, and the eight-device limit covers both. In practice, check this task in two ways. You should be able to sign out of root, sign in as the new administrator, and reach the Billing and Cost Management console.
Cleanup: none. This identity is the one you will use from here on.
Task 3: A zero spend budget emails you before the first real charge
Goal: get an email the moment spending goes past what is free.
AWS Budgets has a template route: a single-page setup instead of the five-step advanced workflow.
Steps:
- Open the Billing and Cost Management console and choose Budgets in the navigation pane.
- Choose Create budget at the top of the page.
- Under Budget setup, choose Use a template (simplified).
- Under Templates, choose Zero spend budget. It notifies you once your spending exceeds Free Tier limits.
- Fill in the details the template asks for, then choose Create budget.
What you should see: a new budget in your Budgets list.
Once you start spending on purpose, the Monthly cost budget template is a better fit. It alerts you when you exceed a set amount, and also when you are forecast to exceed it. Templates are only a starting point. Under Template settings, choose Custom to change any setting later. Choose JSON to download the budget for use with the command line or infrastructure templates.
Think of the zero spend budget as a smoke alarm, not a sprinkler. It tells you something is burning. It does not put the fire out.

The template path reaches a working zero spend budget from one page
Find the Free Tier gauge and send its alerts to an inbox you read
Goal: see how close each service is to its free limit, and make sure the warnings reach you.
You get two layers of warning. Free Tier usage alerts are emails sent automatically when you pass 85 percent of the free limit for a service. The zero spend budget from Task 3 covers the last stretch up to 100 percent. You can also filter a budget to watch one service. For example, a budget can alert you when you are forecast to exceed the full free limit for block storage.
These alerts cover services with an active free offering in the current month. Examples include the first 25 GB of DynamoDB storage and the first 10 custom CloudWatch metrics.
Where the gauge lives: on the Billing and Cost Management home page, the Recommended actions widget shows a recommendation once a service passes 85 percent of its free limit. On a paid plan, the Free Tier page in the same console shows your usage against trial and Always Free limits. It also shows when you pass them and move to pay-as-you-go pricing.
Check where the email goes. By default, alerts go to the address that created the account, the root user’s email. If you never read that inbox, change it:
- Open the Billing console and choose Billing preferences under Preferences.
- For Alert preferences, choose Edit.
- Enter the address that should receive alerts, then choose Update.
On the same screen, confirm that Receive AWS Free Tier alerts is selected. The 85 percent alerts are on by default for individual accounts. A management account in AWS Organizations must opt in.
What you should see, and what you might not: the gauge can come up empty for several reasons. The service may have no free offering, or your Free Tier may have expired. You may be signed in to an Organizations member account, or working in a GovCloud Region. An empty gauge in those cases does not mean zero cost.

Two warnings in sequence: an automatic email at 85 percent, then your budget at 100 percent
Task 4: Build something small, watch it register, then delete it
Goal: prove the safety net works before you depend on it.
Pick one small resource covered by a free offering. Create it, and leave it running long enough for usage to register. AWS tracks usage by “usage type,” a label for the exact kind of consumption. For example, BoxUsage:freetier.micro means you used an EC2 micro instance. The Free Tier usage alerts and the Top AWS Free Tier Services by Usage table cover both expiring and non-expiring offerings. Your test resource should appear there under its usage type.
The sources here do not say how long that takes to appear, so a sensible approach is to check back rather than expect it instantly. You are not trying to trigger an alert. You are confirming that the gauge sees what you built.
Cleanup is the point of this task. Delete the resource. Then check its service page to confirm nothing is left behind, such as attached storage or a saved snapshot. In practice, cleanup leftovers are the classic way a “free” experiment turns into a line on a bill. Your zero spend budget is the backstop that catches them.

The lab loop: build, confirm the gauge sees it, delete, then confirm nothing remains
Key takeaways
- Lock root first. Enable MFA while signed in as root, enter the two codes promptly, and back up the secret key or register a second device. Losing the only device means calling customer service.
- Stop using root daily. A separate administrator identity with its own MFA is a sensible default, so the all-powerful root user rarely signs in.
- Alarms come in layers. Automatic emails at 85 percent of each free limit, plus a zero spend budget at 100 percent. Both reach you only if the alert address is an inbox you read.
- Credits cushion, they do not cap. On a paid plan, credits absorb eligible overage until they run out. Then standard rates apply.
- Test the net once. Build one small thing, see it on the Free Tier gauge, delete it, and check for leftovers.
What this article does not settle. The sources behind it do not give the steps for creating the administrator identity, or the exact command-line calls for these tasks. It also does not cover how quickly usage shows up on the gauge. Alerts and budgets tell you about spending; nothing here stops spending automatically.